This is one of the most difficult questions to answer and one of the most frequently requested. Many factors influence cake baking temperature and time, including ingredients, pan size, oven temperature, height, and so on.
The temperature to Bake A Cake is between 325 and 450 degrees Fahrenheit.
In most convection ovens, the fan must be switched off, and the temperature must be between 25 to 50 degrees Fahrenheit. Use two oven thermometers (one on each side) to check the correct oven temperature, and bake as close to the middle of the oven as feasible for adequate air circulation.
Table of Contents
- What is the temperature for baking cake in a microwave oven?
- Layer Cake Baking Times and Temps: For 2-inch deep pans
- Layer Cake Baking Times and Temps: For 3-inch deep pans
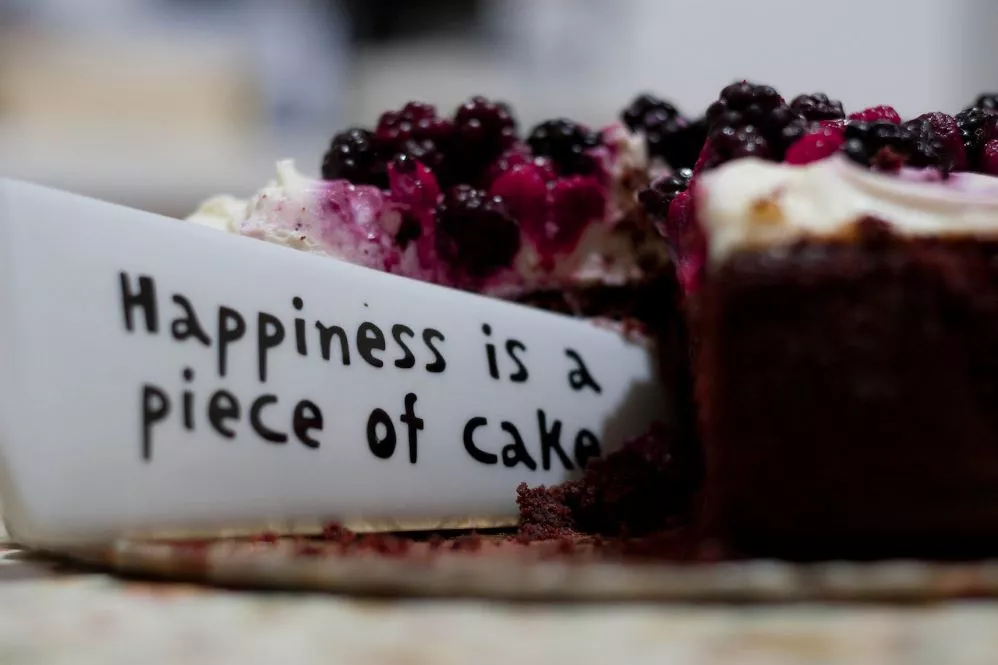
- Home-Made Cake Recipe
- Points to Keep in Mind When Baking a Cake
- When is the cake done?
- Enjoy your perfectly baked cake!
- Cake Bake Temperatures – My Opinion
What is the temperature for baking cake in a microwave oven?
There is no such thing as a temperature setting in a microwave oven. There are only a few power levels to choose from 1 to 10. To bake a cake in a microwave oven, one must set the power level to 100% of the total power efficiency. 180°C is the set temperature for baking a cake in a microwave oven with convection mode.
Before baking, preheat the oven and prepare the baking pans for at least 20 to 30 minutes. Before the batter is mixed, the cake pans are prepped. The pan is commonly buttered for little (butter or oil) cakes.
The pan for non-foam cakes may not be oiled on all sides or may not be greased at all. Therefore, make sure you carefully follow every step of the recipe.
The crumb formation depends on the degree of rising when the cake is first placed in the oven, and rapid heat absorption plays a role.
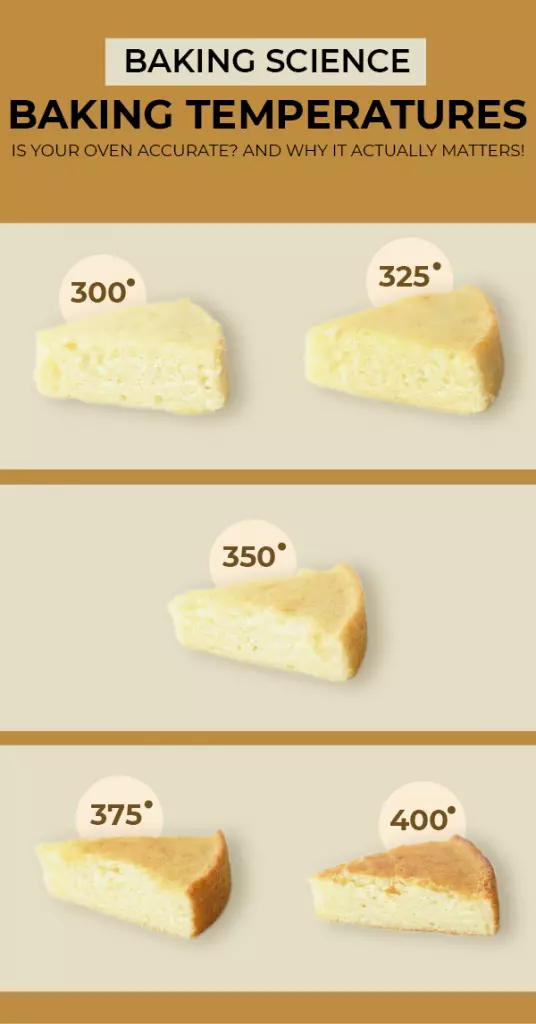
Baking at 350 degrees Fahrenheit is a happy medium between 300 and 400 degrees Fahrenheit, yielding a cake with the best of both worlds.
It has a lightness, texture, and caramelized flavor. Changing the temperature at which you bake significantly impacts how well your cake turns out.
You can better forecast the end outcome of your cake if you know how accurate your oven is. Recheck your oven temperature if you’ve ever baked a recipe and wondered what went wrong.
Most ovens are wrongly calibrated, causing you to bake at a higher or lower temperature than the temperature stated in the recipe. Therefore, it is critical to get an oven thermometer to verify the temperature and make necessary adjustments.
Plus, by moving the heat dial on your oven slightly up or down, you can have some control over the height and texture of your cakes.
Layer Cake Baking Times and Temps: For 2-inch deep pans
| Shape | Size | Cups – batter | Temp(F) | Time |
|---|---|---|---|---|
| Round | 6″ | 2 | 350ᵒ | 25-30 |
| 7″ | 2½ | 350ᵒ | 30-35 | |
| 8″ | 3½ | 350ᵒ | 30-35 | |
| 9″ | 5½ | 350ᵒ | 30-35 | |
| 10″ | 6 | 350ᵒ | 35-40 | |
| 12″ | 7 ½ | 350ᵒ | 35-40 | |
| 14″ | 10 | 350ᵒ | 50-55 | |
| 16″ | 15 | 350ᵒ | 55-60 | |
| Square | 6″ | 2 | 350ᵒ | 25-30 |
| 8″ | 4 | 350ᵒ | 35-40 | |
| 10″ | 6 | 350ᵒ | 35-40 | |
| 12″ | 10 | 350ᵒ | 40-45 | |
| 14″ | 13½ | 325ᵒ | 45-50 | |
| 16″ | 15½ | 325ᵒ | 50-55 | |
| Sheet | 7″ x 11″ | 5½ | 350ᵒ | 30-35 |
| 9″ x 13″ | 7 | 350ᵒ | 35-40 | |
| 11″ x 15″ | 11 | 325ᵒ | 35-40 | |
| 12″ x 18″ | 14 | 325ᵒ | 40-45 | |
| 14″ x 22″ | 16 | 325ᵒ | 45-50 | |
Layer Cake Baking Times and Temps: For 3-inch deep pans
| Shape | Size | Cups – Better | Temp(F) | Time |
|---|---|---|---|---|
| Round | 6″ | 3 | 350ᵒ | 35-40 |
| 8″ | 5 | 350ᵒ | 55-60 | |
| 10″ | 8 | 350ᵒ | 65-75 | |
| 12″ | 10½ | 350ᵒ | 60-65 | |
| 14″ | 15 | 325ᵒ | 75-85 | |
| 16″ | 18 | 325ᵒ | 75-85 | |
| Square | 8″ | 6½ | 350ᵒ | 60-65 |
| 10″ | 9 | 325ᵒ | 65-75 | |
| 12″ | 14 | 325ᵒ | 65-75 | |
| 14″ | 19 | 325ᵒ | 65-75 | |
| Sheet | 9″ x 13″ | 11½ | 325ᵒ | 70-75 |
| 11″ x 15″ | 16 | 325ᵒ | 80-85 | |
| 12″ x 18″ | 20 | 325ᵒ | 85-90 | |
Home-Made Cake Recipe
Ingredients of Homemade Cake
- 3 cups all-purpose flour
- 4 egg
- 2 teaspoon baking soda
- 2 teaspoon vanilla essence
- 1 1/2 cups powdered sugar
- 1 cup butter
- 1 cup milk
How to make a cake
STEP: 1 Cream together butter-sugar and then blend with beaten eggs
It’s never been easier to make a homemade sponge cake. Begin by combining the sugar and butter. Using a hand whisker or a fork, whisk until light and fluffy. After that, add the beaten eggs and mix thoroughly. Continue to beat until the mixture is white and creamy.
STEP: 2 Combine flour mix and beaten eggs
Mix the all-purpose flour and baking soda in a tea strainer. This is done to ensure that the baking soda in the flour is spread equally. Gradually include it in the egg mixture. Add a little milk if necessary and mix until the batter is frothy and moist. If the consistency of your cake is fine and it pours down like canned condensed milk, you may not use all of the milk. Blend in the vanilla extract thoroughly. The vanilla essence is necessary to mask the egg odor and make the cake taste nice.
STEP:3 Bake the cake
Take a baking tin and oil it thoroughly with butter or cooking spray to bake the cake. After that, dust it with maida or all-purpose flour. It will keep the cake from adhering to the bottom of the pan. You can also line it with butter paper to make it easier to remove the cake once it’s baked. bake a cake in an electric oven at 350 degrees Fahrenheit for 30-35 minutes.
STEP:4 Check with a knife
If a knife or a metal skewer inserted into the cake comes out clean, the cake is done. Allow cooling on a wire rack after removing from the oven. This cooling procedure is carried out to ensure that the cake does not break down in the middle and comes out perfectly clean. Turn the cake tin upside down to remove the cake once it has cooled. You can also use the butter paper to lift the cake off, but you’ll need to be a pro to do it quickly enough to avoid breaking the cake.
As a result, for a better cake, turn the tin upside down. To avoid a doomed top, cut an even piece of the cake from the top before decorating. However, make sure you conduct this step when the cake is still warm, not cold. Now, take some whipping cream and evenly coat the cake, scraping away any excess cream. After that, you can garnish the cake with cherries or tutti-frutti, depending on your preference. The cake is now ready.
STEP 5: How to make whipping cream
All you need is a mixing bowl, heavy whipping cream, powdered sugar, vanilla extract, and an electric mixer to prepare whipped cream for a cake at home. In a mixing basin, combine the heavy whipping cream, powdered sugar, and vanilla extract. Using a medium-high-speed mixer, combine all of the ingredients. It is important to note that this should not be overdone. It’s a sign that you’ve over-whipped the cream if it comes out gritty and curdled. In a few minutes, say 2-3 minutes, the softly whipped cream will be ready. Make sure to check the consistency of the whipped cream in between. When raised off the counter, the perfect whipping cream will have a firm peak. It shouldn’t be too liquid or soft, and it shouldn’t be curdled or heavy. You can also use a cone to adorn your cake once it’s finished.
Points to Keep in Mind When Baking a Cake
Your Ingredients are at room temperature
The temperature of your ingredients has a significant impact on the outcome of your cakes. Make sure all of your ingredients are at room temperature, including the eggs, you can use white or brown eggs, milk, and butter. It is critical to remove all of your items from the refrigerator ahead of time. If you forget, you can melt your butter in the microwave for 10 seconds and then place your eggs in a dish of warm water for 10 minutes. This easy procedure will ensure that your mixture properly emulsifies. Only cream, which should be kept chilled when used in baking, is an exception.
Prepare your pans well
The worst thing you can do to your cake allows it to stick to the pan. Nothing is more distressing than breaking a perfectly baked, fluffy, and moist cake because it has clung to the tin. Always use a pastry brush to butter or oil your pan.
Make sure there are no unbuttered corners. Dust your tin with flour and tap out any excess (dust with cocoa powder in case of chocolate cakes). I would also consider lining your prepared pan with parchment paper just to be cautious. There’s no way your cake will stick to the pan if you follow these three simple instructions.
Mix it right
This is the most important stage in constructing a great cake. While mixing the wet ingredients (particularly while creaming the butter or oil with the sugar), mix well. This helps to incorporate air into the batter, resulting in a light and fluffy cake.
When mixing your dry components with your liquid ingredients, however, be careful not to overmix. It’s a heinous crime! I know it’s tempting to mix aggressively right now, but doing so will simply remove all of the air, resulting in a dense cake.
A spatula comes in helpful at this point. Always fold your dry components into your wet ingredients and only mix until they are thoroughly combined. However, not actively mixing does not imply leaving flour pockets in the batter.
Don’t leave your batter to rest on the counter for too long.
Put the cake batter into the preheated oven as soon as it’s ready. As soon as the raising agents come into touch with the wet ingredients, they begin to work. Allowing your batter to sit on the counter after it’s been prepared will hinder your cake from rising properly.
Make sure your pans are in the right place and the oven door is closed.
It’s important to position the tin in the center of your baking tray and then slip that tray into the middle rack. This guarantees that your cake bakes evenly. Halfway through the baking period, I recommend turning your pans. And that is only when the oven door is opened ( besides finally opening it to take out your cake). If you’re as enthusiastic about baking as I am, you’ll understand how tempting it is to open the oven door and double-check your cake. However, every time you open the oven door, the baking process comes to a halt. The cake will most likely collapse if you do this. As a result, you must wait until the cake is completely set before eating it.
Be patient
Be patient after removing your cake from the oven and allowing it to cool completely. Because a hot cake is so delicate, handling it increases the possibility of it breaking. Allow at least 15 minutes for the cake to cool in the pan before removing it. Allow it to cool for another 10 minutes on your cooling rack after demolding.
When is the cake done?
When determining whether a cake is done baking, there are five characteristics to look for. Some of these tests will be more valuable than others depending on the type of cake you’re preparing, so it’s crucial to learn them all.
We’ll start with cake-testing methods that don’t even include opening the oven.
1. The edges pull away
Peer through the oven window as your cake approaches the conclusion of the bake time to inspect the edges. The sides of your cake should have been pushed away from the pan slightly when it’s done.
The first part of the cake to solidify and become fully baked is the edges. As the rest of the cake bakes and the crumb tightens, they shrink inward.
When the cake is almost done baking, a little gap will form between the sides of the cake and the pan if you oiled it. It’s possible that the gap is small: 1/8″ to 1/4″ is typical. This indicates that the cake’s outer layer is fully baked, and the middle is likely to be as well.
The borders pulling away from the cake is a good initial clue that it’s getting close to the end of the bake time, but you’ll want to try a couple more approaches before pronouncing it done.
2. The cake smells fragrant
You should also notice something else when looking at the sides of the cake. Something beautiful.
When your cake is done baking, the smells of butter and sugar will permeate your kitchen.
A Vanilla cake has a lovely aroma. Our noses and tastebuds are related, even though “sweet” is strictly a flavor. “There’s something sweet around here!” our brains tell us when we smell vanilla and sugar.
The aroma of chocolate cake as soon as it comes out of the oven is irresistible. When you’re seeking indicators of completion, take a moment to take it all in.
Once properly baked, chocolate cake emits its signature scent — chocolate, occasionally with traces of coffee — as expected. It may bring back memories of s’mores, hot chocolate, or other childhood chocolate sweets. (Memory and smell are inextricably intertwined.)
If you can smell your cake, it’s generally almost done. If there isn’t any aroma, the dish will need extra time in the oven.
3. The top turns golden brown
It’s time to open the oven and take a peek at your cake after it smells lovely and the edges have peeled away from the pan’s sides.
Like a nicely toasted marshmallow, the edges should be slightly darker. Color should have developed in the center as well. It may turn a light honey color or a rich golden brown, depending on the cake formula. The more sugar in your recipe, the darker the finished cake will be.
How about a slice of chocolate cake? It’s difficult to detect if the borders are going golden brown because of the chocolate powder in the batter.
4. The toothpick (or paring knife) test
If your cake passes the first three tests, it’s time to use a toothpick to poke it. Alternatively, locate a paring knife.
While you may have watched someone in the kitchen poke toothpicks or long spears into cakes to check for doneness as a kid, toothpicks don’t have a lot of surface area. Consider using a paring knife to reveal underbaked crumbs more clearly. When making a cake or fast bread with a thick batter, such as pound cake or banana bread, a knife comes in handy.
If you cover the cake with frosting, the small incision formed by the paring knife will be hidden. If you’re not icing the cake, a toothpick can help to reduce the size of the hole that remains.
The purpose of this test is to see if the crumb has been set by inserting a toothpick or paring knife into the middle of the cake. It’s finished if the tester comes back clean. If the cake is gooey or has crumbs stuck to it, it requires a longer time in the oven.
While this method can be used to evaluate the cake, it is not sufficient as a test in and of itself. (A tester may come out mostly clean, but the cake may still require additional baking time.)
5. The cake springs back
You’ll want to measure the texture of the cake in another way once you’ve tested it with a toothpick or paring knife. To test this, gently press on the cake’s core with a few fingers to check whether it springs back.
Your cake isn’t done baking if your fingertips leave minor indents. Before testing it again, return it to the oven for at least 5 minutes.
If the cake springs back to your touch, it means the crumb structure has set and the cake is done baking. Take your cake from the oven and cool it on a wire rack until the recipe directs you to remove it from the pan (if it does at all).
Enjoy your perfectly baked cake!
It’s tough to determine when a cake is finished baking, especially if it’s a chocolate cake. That’s why we rely on all of these indicators at the same time:
- The cake’s borders begin to pull away from the pan’s sides.
- It has a pleasant aroma.
- Golden brown on top and around the edges (or look matte for chocolate cake).
- If you use a toothpick or a paring knife, it will come out clean.
- When gently squeezed, the cake springs back.
To conduct these tests and obtain information about the cakes you prepare, use your senses. Soon, you’ll have a sense of when specific dishes are done appropriately.
Keep in mind that practice (cakes) makes perfect, so keep baking and sharpening your instincts by making more and more cakes!
Cake Bake Temperatures – My Opinion
As you read it is very important to bake a cake at the right temperature. However, it is also important to enjoy the whole process, and baking a cake can be a part of cooking with children and to learn them how to have fun with cooking.